I have had another great gap between posts, but let me assure you, this time was not wasted. During my apparent silence, I have been working on a new project. I was making yet another 3D printer.
This project is a major improvement upon one of my previous projects, Marlowe. The shoddily-built delta printer was not cutting it for me, being much too unreliable, slow, and loud. Because of this, I dismantled it. With the leftover components, I was able to build a larger, sleeker, faster, and all around better 3D printer. Consequently, I deemed this machine “Take Two”.

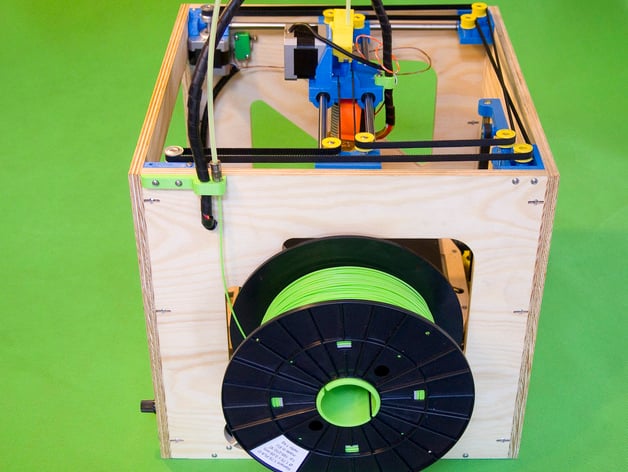
Take Two is a CoreXY machine based largely on this thingiverse model with a few modifications and optimizations of my own. I custom designed the machine’s frame to be compatible with the 400mm and 600mm rods I had left over from Marlowe, and simplified construction so it could be fabricated without a laser or CNC router (I do not have access to machines big enough to cut these large panels). The machine also has redesigned X and Y carriages, endstop mounts, extruder assembly, and print bed.
 |
| An image of the original base printer |
Many of these modifications were done for compatibility’s sake, but also for overall improvement of design. For instance, the Z assembly was completely redone from the ground up to accommodate leadscrews rather than belts and pulleys. With a larger printer, belts do not have the torque, hold, and precision needed to keep the bed in place.

The extruder and carriage were given a do-over as well. I moved the stepper motor off the carriage in favor of a bowden setup. This gives the advantage of faster and lighter movement along with ease of assembly. The carriage itself was completely redesigned to better fit the machine I was building. The unit is largely one piece. It uses snap-fit bearing holders instead of the screw clamps used in the original model. I also added tabs for easy installation of printhead addons like autolevelers, cameras, and wire clips (all three used on my particular machine).


Electronic components are housed underneath the floor panel out of sight. With my particular unit, I used my leftover RUMBA board and case in the assembly, but I will add holes for a relatively popular RAMPS enclosure for final release. I have included holes for a CHIP computer as well, so I can run an onboard OctoPrint instance. The producers of the CHIP are defunct, but a raspberry pi zero (or zero W, etc.) can be substituted in (I will not be making hole accommodations for this. You will have to modify the vector yourself, but then again, I might…).


So far, there is only one outlying immediate issue with this machine. I made the mistake of placing the Z rods too close together. With the original template (the printer I based this on), 100mm rod spacing isn’t that big of an issue because it is only 300mm tall or so. With my machine, I used 600mm smooth rods for my Z axis. This results in a somewhat “wobbly” platform and terrible “Ghosting” effects. This is especially apparent when the bed is in the middle of the Z track. The issue should be reduced by spacing the rods out. I will include both an original and revised version upon release.
The frame itself is composed of 6 pieces of wood (the 6thbeing for bed support). It is designed in a way to be as simple as possible, optimized for milling or cutting by hand (as explained in the first paragraph). Any thickness of wood can be used to build this machine. I used 3/8 inch wood for mine, but the CAD model I made beforehand used 20mm wood panels. It is not perfectly 100% modular, though. Some of the brackets need to be scaled proportionately with the wood to hold the bottom plate even with the side of the printer. Luckily, I created an openSCAD bracket that can be customized with the Thingiverse Customizer to set proper size.
 |
| These brackets are longer than the others. They have been scaled to fit the wood. |
The printer frame is plenty robust; however, for extra stability, it could use a top panel. Of course, this comes at a cost of more material. I may release these updates with a later iteration of the printer (a Take Three, maybe?).
 |
| The early obligatory Benchy test. |
As always, I am continuing development on these machines constantly, and will try to post updates more frequently.
(A note from Me from the Future: HA! that didn't happen. I've had this printer for 2 years now since I spat out this draft, and have only now just posted it. The machine works fine, can print massive ABS thingies, and is a staple in my print farm. I can't get updated pictures of it yet, I left it at college, but I will try to get some updates when I get my hands on it again.)


No comments:
Post a Comment